From Idea…. to Paper… to Real Life
Thursday, August 5, 2021 3:00 PM by Greg Duitsman in Design and Planning

In today’s world so much is taken for granted. Watching TV, hopping into the car for a drive, getting a snack from the fridge. Can you imagine what the first colonists in Jamestown would think of air conditioning or smartphones! I know what you are thinking… So, what’s your point? Simply this, everything, and I mean literally everything, is engineered. An object as simple as a rubber band or a paper clip had to be prototyped and tested and ultimately designed for manufacturing.
At Taylor Studios, our exhibit designers do a wonderful job of designing inspiring displays that stand the test of time. My responsibility as a construction detailer is to make sure the structures are safe, and meet building codes and ADA standards—all without compromising the design intent.
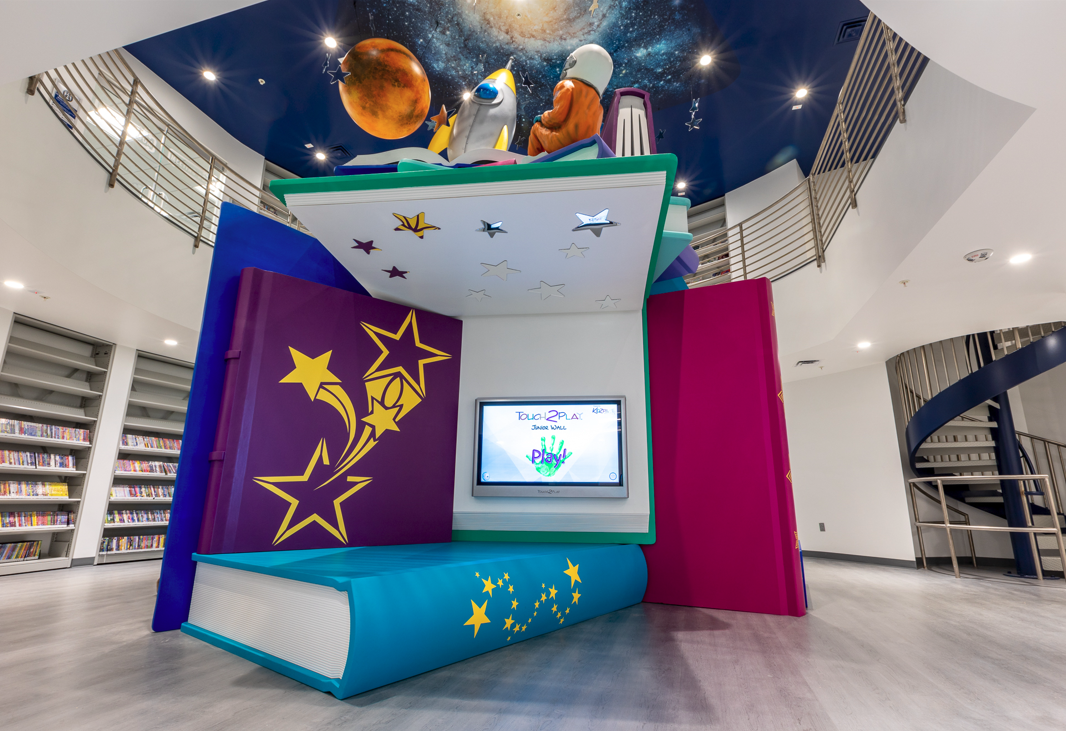
I’ll walk you through the basic steps of how this is done with a recent project example: Book Mountain. We designed, built, and installed Book Mountain the Cybrarium, a one-of-a-kind library in Homestead, Florida. The project features a towering stack of giant books that reach up to an outer space ceiling with a rocket ship and hanging planets.
1. Designing the Exhibit

Our design team works with our client to create a design for the exhibit that will convey the desired content in an engaging and relevant way. The style, color, arrangement of objects, and all other aesthetic choices are worked out in this phase.
2. Researching Construction Techniques and Materials

We determine exactly how the exhibit will be physically built. We figure out what internal support structures will be needed, and choose the exact materials and hardware. We do this by looking back at successful projects and drawing on the experience of our knowledgeable fabricators. If necessary, we go above and beyond what we have done before—brainstorming new technologies and techniques, then prototyping and testing them.
3. Creating a 3D Model

We put it all together in a 3D computer model. Autodesk Fusion 360 is our preferred software system for 3D design, while AutoCAD is our go-to for 2D design. First, we use the software to create a model of each piece of the structure. Then, we check that the structure will support itself. For Book Mountain, we made sure that the books on the bottom of the stack would support the books on top. Finally, we make the assembly views—instructions for putting all the pieces of the exhibit together. They end up looking a lot like the instructions for a piece of IKEA furniture.
4. Cutting out the Pieces
For Book Mountain, we used our CNC machine to cut out the pieces of wood that formed the shape of the books. We pulled digital files from our 3D model that showed the machine how to cut out the shapes. This process is precise and much faster than cutting everything out by hand.
5. Building the Structure

Our talented fabrication team takes over. They study the assembly views and build the final structure.
Final result: A fantastic display that will be enjoyed for many years!
Share this on social networks
 Back to blog posts